Using Web APIs to Create a Camera Application
code:
https://github.com/rebeccapeltz/webapi-camera
demo:
I enjoy working on applications that connect the physical and digital worlds. I'll show you how to build a camera application in this post.
Web APIs
If you were working as a web developer in 2010, you might remember the blog post in A List Apart that introduced the idea of Responsive layouts to a community that was wondering how to work with so many devices and screen sizes. Media queries, fluid layouts, and flexible images allowed developers to create "m-dot" websites like https://m.mydomain.com, which were served to mobile browsers. CSS has continued to evolve to address the needs of mobile web development.
Native frameworks and languages that could take advantage of the technology available only on mobile devices like cameras and GPS sensors and the ability to provide access without network service led to applications with features not available in web applications. The mobile user could use cameras to take pictures, GPS to navigate the roads, and access the application even when no network was available.
Over that last decade, the W3C's Web Applications Working Group has created specs that, when implemented in a browser, enable web developers to create many of the features found on mobile devices. In this blog, I will describe how to create a web application that makes it easy for a user to take a picture on a desktop or mobile device and then download or share it using Web APIs.
Web APIs vary with the implementation per browser. It is wise to check caniuse.com to verify that the browsers we expect our application to run in are supported. Often, additional research or experimentation is needed to see differences in implementation.
A Camera App for Desktop and Mobile
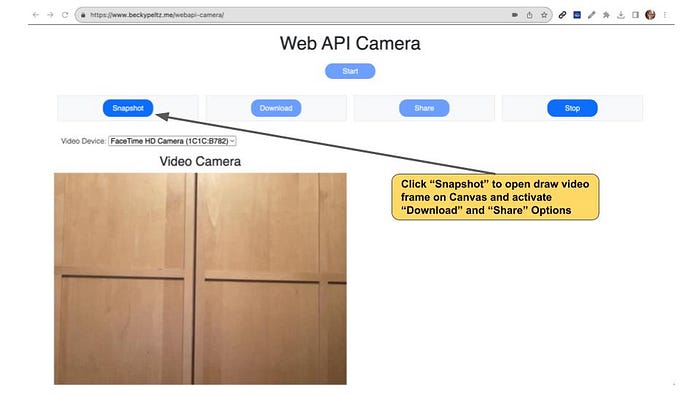
The images below demonstrate the operation of the camera. Buttons are enabled based on the state of the camera. Access the camera demo here, and try it out before digging into the code.

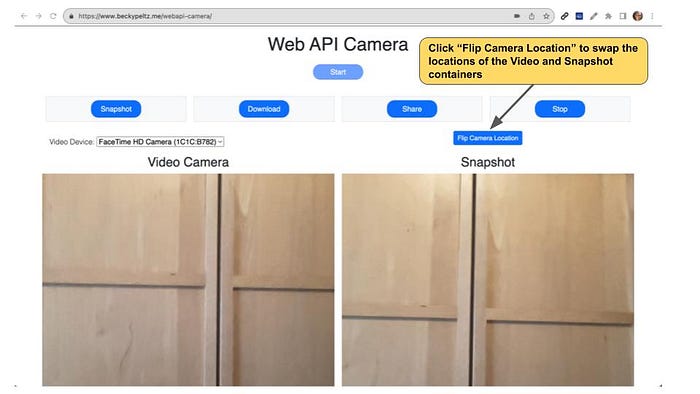


Let's see how to create this web application using Web APIs.
Web APIs
Documentation of Web APIs and interfaces is located on the MDN (Mozilla Developer Network) website. The term "Web API" can refer to browser or server APIs. In this article, it refers to Browser APIs.
The Web API Camera Application is built using these Web APIs:
- DOM
- HTML DOM
- Media Capture and Streams
- Canvas
- Web Share
- Permissions
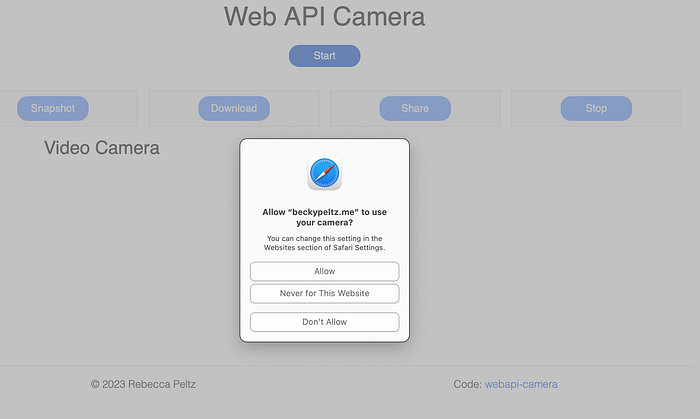
We'll also see how browser permissions require a response from the user because they must allow the application to access hardware.
DOM and DOM HTML
The DOM (Document Object Model) is the first Web API. The interfaces in the DOM are accessible using JavaScript. Styling is provided by Cascading Stylesheets (CSS).
The DOM is a data structure the browser constructs when it parses HTML. This structure represents a Document. The Document object is loaded into the Window object. The Document and Window provide the interfaces for querying and maintaining the application in the browser.
The camera application uses JavaScript to interact with the DOM. This interaction includes adding and removing elements, adding and removing styles, and firing events when the user interacts with the Document.
The application comprises a set of buttons turned on and off according to what the user can do at any given time. The image created from the video stream is drawn onto a canvas HTML element.
The application consists of five buttons enabled based on the user's interaction with the Document. The Start button reveals a container loaded with a video stream, representing the camera view. The first time the user opens the video stream, there will be a prompt for permission because of a request to access media devices. A select element is loaded and displayed. A single option will open a back-facing camera if the application is run on a desktop computer. On a mobile device, there will also be an option to use a front-facing camera. Some mobile devices have multiple back and front cameras, and all these options will be available.
When the user clicks the Snapshot button, a container with a canvas element is revealed, and the current video frame is loaded into the canvas element. This also enables the Download button and displays a Share button. If the browser is allowed to Share, clicking this button will open up options to share using different network applications like email and messaging. The Download button downloads the image to the local hard drive. Finally, a Stop button turns off all the other buttons and hides the containers while enabling the Start button.
DOM Click Event Listeners
The code below shows how to initialize the buttons when the Document is loaded. The DOMContentLoaded event is fired after the HTML tags have been parsed and the elements rendered. We use the querySelector interface to get references to DOM HTML elements identified by their id or class name.
document.addEventListener("DOMContentLoaded", (e) => {
 ...

  // set video
  data.videoEl = document.querySelector("#video");
  data.canvasEl = document.querySelector("#canvas");

  // attach click event listeners
  document.querySelector("#camera").addEventListener("click", (e) => {
    start();
  });
  document.querySelector("#snapshot").addEventListener("click", (e) => {
    snapShot();
  });
  document.querySelector("#stop").addEventListener("click", (e) => {
    stop();
  });
  document.querySelector("#download").addEventListener("click", (e) => {
    download();
  });
  document.querySelector("#share").addEventListener("click", (e) => {
    share();
  });
  document.querySelector("#flip").addEventListener("click", (e) => {
    flip();
  });

 ...
});
DOM Adding and Removing Elements
The video device selector that allows users to select front or back-facing cameras on mobile devices is dynamically loaded based on the available devices. Once we have found available devices, we can add them to the DOM using document.createElement and appendChild to load the Select element options.
  let option = {};
  option.text = device.label;
  option.value = device.deviceId;
  data.options.push(option);
  var selection = document.createElement("option");
  selection.value = option.value;
  selection.text = option.text;
  document.querySelector("#device-option").appendChild(selection);
The Download functionality is implemented using hidden anchor tags, which are added and removed as needed.
// add a link
 let a = document.createElement("a");
 document.querySelector("body").append(a);

// remove
 document.querySelector("body").remove(hiddenLink);
DOM Adding and Removing Styles
As the user moves through the steps needed to access the camera, take a Snapshot, and then download or share, elements are displayed and hidden using two different classes.
The hidden class is display:none which means that when this class is added to an element, it is removed from the DOM. This is used to hide and show the video and canvas containers. The canvas container holds the Snapshot.
function hide(id) {
  let el = document.querySelector(`#${id}`);
  if (!el.classList.contains("hidden")) {
    el.classList.add("hidden");
  }
}
function show(id) {
  let el = document.querySelector(`#${id}`);
  if (el.classList.contains("hidden")) {
    el.classList.remove("hidden");
  }
}
The hidden-link class uses visibility:hidden which leaves the element in the DOM, but it is not visible. This hidden anchor tag will enable the download of the Snapshot.
a.classList.add("hidden-link")The Flip button, made visible when the user clicks on Snapshot, causes the video and canvas containers to change location. This is especially helpful on a mobile screen if you want to look at the image after you've created a Snapshot. The canvas container is initially rendered to the right or below the video container on a smaller viewport.
The video and canvas containers are rendered using the display: flex command. We add toggle logic to flip the containers by adding and removing the CSS command.
if (videoCanvasContainer.classList.contains("flex-row")){
    videoCanvasContainer.classList.remove("flex-row");
    videoCanvasContainer.classList.remove("flex-wrap");
    videoCanvasContainer.classList.add("flex-row-reverse");
    videoCanvasContainer.classList.add("flex-wrap-reverse");
  } else{
    videoCanvasContainer.classList.remove("flex-row-reverse");
    videoCanvasContainer.classList.remove("flex-wrap-reverse");
    videoCanvasContainer.classList.add("flex-row");
    videoCanvasContainer.classList.add("flex-wrap");
  }
Managing State for the Application
The JavaScript for this application can be found in a single file: script.js. The application is both data and user-driven. User actions result in system changes maintained in a JavaScript object.
const data = {
  videoEl: null,
  canvasEl: null,
  fileData: null,
  currentStream: null,
  constraints: {},
  selectedDevice: null,
  options: [],
};
Navigator
The Navigator interface is accessible from the Windows object. The Navigator gets information about the user request in the User Agent (UA) header. The UA represents the person making the request. The UA header is a string that provides information like this :
Mozilla/5.0 (Macintosh; Intel Mac OS X 10_15_7)
AppleWebKit/537.36 (KHTML, like Gecko) Chrome/118.0.0.0 Safari/537.36
We'll use the Navigator to access the user's media stream. We can discover our users' video and audio devices from the media stream. For this camera application, we'll be interested in the video devices.
Permissions
The Media Capture and Streams API, which opens up the video stream in the video container, can query the Permissions API to determine if the user allows the application access to the video.
The rule for prompting for permission when the navigator.getUserMedia function is called varies among browsers. The image below shows the user permission request on Safari. The choice to allow access to the camera will remain in effect on Safari until there is a page refresh. On Chrome, the permission remains in effect between page loads.
Media Capture and Streams
The Media Capture and Streams API is part of the Web Real Time Communication API (WebRTC). WebRTC is used for user video and audio communication. We'll use just the video capture to provide a stream of video frames from which we can create a Snapshot.
In the Start function, we call a getDevices() function. This function aims to discover the devices available and load them in the Video Device Select element.
async function getDevices() {
  // does the browser support media devices and enumerateDevices?
  if (!navigator.mediaDevices || !navigator.mediaDevices.enumerateDevices) {
    console.log("enumerated devices not supported");
    return false;
  }

  // call getUserMedia to trigger check and prompt for permissions
  await navigator.mediaDevices.getUserMedia({ video: true });

  // get the list of video devices
  let allDevices = await navigator.mediaDevices.enumerateDevices();
...
Initial Selected Device
Once the devices are loaded, we set them selectedDevice to the first, and sometimes only, device in the list. Recall that the desktop video is not back-facing.
Next, we place constraints for the video stream we will render. The setConstraints function will be called when the user first clicks Start and later when they select different devices if multiple devices are available.
function setConstraints() {
  const videoConstraints = {};
  videoConstraints.deviceId = {
    exact: data.selectedDevice,
  };

  data.constraints = {
    video: videoConstraints,
    audio: false,
  };
}
Once the constraints are set, the getMedia function is called to start streaming media from the device's camera. The stream window.stream is bound to the video element.
async function getMedia() {
  try {
    data.stream = await navigator.mediaDevices.getUserMedia(data.constraints);
    window.stream = data.stream;
    data.currentStream = window.stream;
    data.videoEl.srcObject = window.stream;
    return true;
  } catch (err) {
    throw err;
  }
}
With the video streaming, the Start button is disabled, and the Snapshot and Stop buttons are enabled.
if (resultMedia) {
    disableBtn("camera");
    enableBtn("stop");
    enableBtn("snapshot");
  }
Device Change
If the user has the option to change the selected device, the deviceOptionChange function calls deviceChange to stop the camera, close the canvas container, and then call getMedia to reopen the camera using the newly established device.
async function deviceChange() {
  stopVideoAndCanvas();
  setConstraints();
  const result = await getMedia();
  console.log("device change:", result);
}
Calling GetMedia Twice
You may have noticed that the GetMedia function is called twice when the user presses Start. To access devices from the Navigator, the user must get permission. The function call to getUserMedia triggers the permission prompt:
await navigator.mediaDevices.getUserMedia({ video: true });We want to get the list of devices before loading the video, so the first call to getUserMedia takes care of access to the devices. We use the selected device to set the constraints that provide the video stream. The second call opens the video stream and assigns it to our data state.
data.stream = await navigator.mediaDevices.getUserMedia(data.constraints);Snapshot
We'll use the Canvas API and element to create a snapshot. The Snapshot is made from the video stream frame visible when the Snapshot button is pressed.
When the user clicks Snapshot, we show the canvas container and the Flip button. Clicking on the Flip button when using a mobile device makes it easier to see what was captured from the video stream.
The canvas HTML element is assigned a width and height equal to the dimensions of the video element. We then use the Canvas API to draw a 2-dimensional image from the video element onto the canvas element. The signature we use passes the video element (image), dx (horizontal distance of the image from the left side of the canvas container), dy (vertical) distance of the image from the top of the canvas container, the width of the container, and the height of the container.
drawImage(image, dx, dy, dWidth, dHeight)
Finally, we use the toDataURL to capture the data that makes up the frame from the video. Looking at the string created, we can see the type and then base64 values that represent the image.
data:image/jpeg;base64,/9j/4AAQSk...function snapShot() {
show("canvas-container");
show("flip-button");
data.canvasEl.width = data.videoEl.videoWidth;
data.canvasEl.height = data.videoEl.videoHeight;
data.canvasEl
.getContext("2d")
.drawImage(data.videoEl, 0, 0, data.canvasEl.width, data.canvasEl.height);
data.fileData = data.canvasEl.toDataURL("image/jpeg");
let hiddenLinks = document.querySelectorAll(".hidden_links");
for (let hiddenLink of hiddenLinks) {
document.querySelector("body").remove(hiddenLink);
}
enableBtn("download");
enableBtn("share");
}Download
We're using a hidden link to download the image. This technique involves creating a hidden anchor tag with a download attribute and programmatically clicking it. We start by removing any previously hidden links.
Then, we use the DOM API to add a new anchor element to the Document. We set the hypertext reference hrefto the data from the image and the textContent to none . We set thetarget to _blank , an unnamed window, because we are not navigating anywhere. We sent the download element to a filename. The download attribute tells the browser to respond to a click event by downloading the data in the href . By calling the anchor tag's click event, we trigger the download of the image.
function download() {
  // cleanup any existing hidden links
  let hiddenLinks = document.querySelectorAll(".hidden_links");
  for (let hiddenLink of hiddenLinks) {
    document.querySelector("body").remove(hiddenLink);
  }

  if (data.fileData) {
    let a = document.createElement("a");
    a.classList.add("hidden-link");
    a.href = data.fileData;
    a.textContent = "";
    a.target = "_blank";
    a.download = "photo.jpeg";
    document.querySelector("body").append(a);
    a.click();
  }
}
Web Share
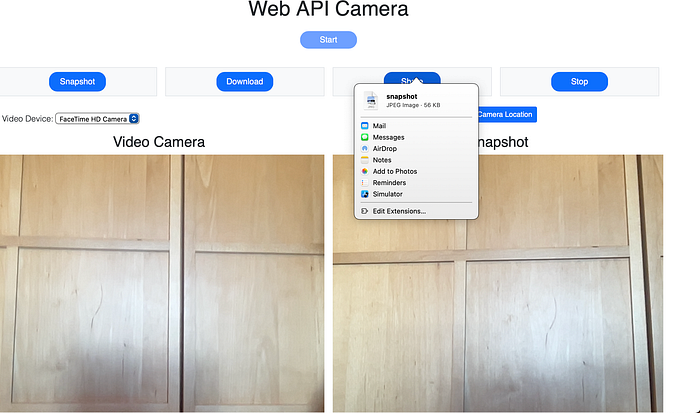
The Share API allows web applications to share images and text. This API doesn't work in Chrome Desktop but does work in Safari, Edge, and Android Chrome. You can see in the image below, taken from an instance of Safari on a Mac, that it will allow you to share the Snapshot to Mail, Message, AirDrop, Notes, Photos, Reminders, and Simulator. This is an instance where caniuse.com can help plan the feature set for an application.
What's Next?
New features, JavaScript frameworks, and enhanced styling will help to build a better camera application. While the processing of composing an application using Web APIs can be an end in itself, it's also worth noting that this application is waiting for a step up.
Modifying the Image
Offer options to modify the image drawn into the canvas element. This example shows you how to convert the image to grayscale.
Modifying Exif Data
Use the Geolocation API to get the latitude and longitude of the data. Then, a library like exif-js adds this data to the image before downloading or sharing it.
Port the Code
Port the code from this camera application to React, Angular, or Vue. This is always a good exercise and will result in a better understanding of the state and logic.
Style
Look for ways to improve the layout and usability of this application.
Take Some Pictures
Use the camera you create. Find out if there are any features you would like to add and add them!

